今天我們就上次 MonkeyTalk 的內容繼續說下去,這一節我們要說的昰 MonkeyTalk Agent的 Android篇,不久前我們說過將 iOS Agent 透過 Xcode植入到 iOS 裝置,如果當我們遇到 Android裝置時,該怎麼辦??? 這時候就需要將 Android Agent植入到裝置裡,才能透過 IDE 錄製的腳本做自動化測試。
那我們就開始今天這一節的內容:

Step 1: Download Eclipse from link as below and unzip.

Step 2: Double click "eclipse.exe" from the download or unzip folder.

Step 3: Show the logo of eclipse then change the "workspace" folder at root of C:\ and click OK.


Step 4: After that show the Eclipse IDE interface.

Step 5: Download AspectJ Development Tools plugin (AJDT) from the link as below.
ajdt_2.2.4_for_eclipse_4.4.zip

Step 6: Install the AJDT into Eclipse. From "Help " then double click "Install New Software..."
Help | Install New Software...

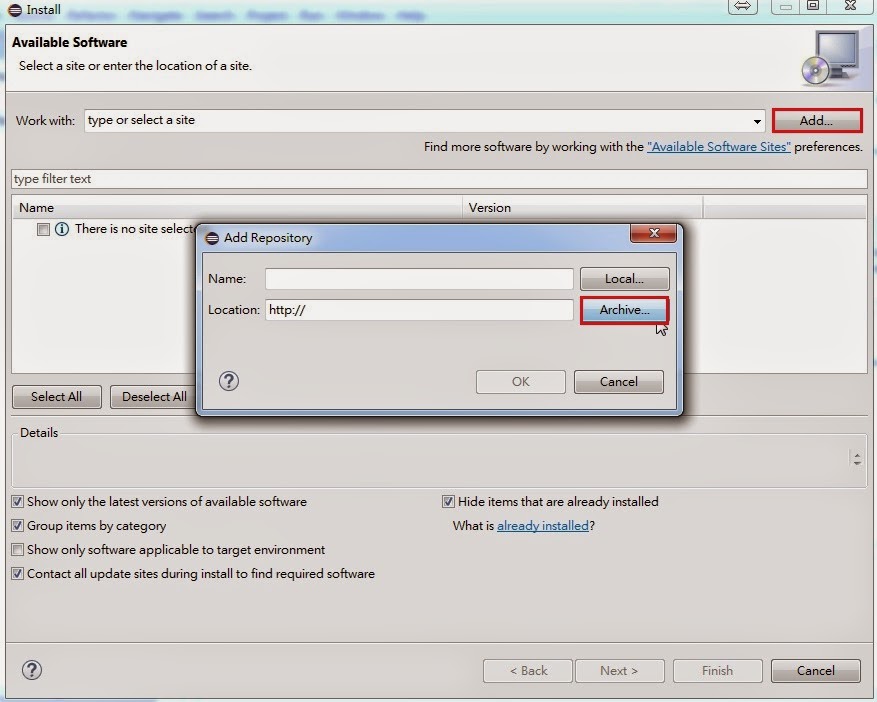
Step 7: Click "Add..." then click "Archive..." and add the file "ajdt_2.2.4_for_eclipse_4.4.zip" then click "OK".

Step 8: Click "Select All" then click "Next >".

Step 9: Click "Next >" then select "I accept the teams of the license agreements" and click "Finish".


Step 10: Waiting for awhile until finish then click "Yes" to restart Eclipse.


Step 11: Install Android Development Tools(ADT). From "Help " then double click "Install New Software..."
Help | Install New Software...

Step 12: Enter "Work with" URL as https://dl-ssl.google.com/android/eclipse/ and enter then tick "Developer Tools" and click "Next".

Step 13: Click "Next >" then select "I accept the teams of the license agreements" and click "Finish".


Step 13: Waiting for awhile click "OK" until finish then click "Yes" to restart Eclipse.


Step 14: Download Android SDK tools from link as below then double click "install_r24.1.2-windows.exe" to install the tools.
installer_r24.1.2-windows.exe

Step 15: Follow by the steps as below in red to finish the installation.


Step 16: Open eclipse and create a new android project. Double click "eclipse.exe" from the Eclipse unzip folder then select File | New | Android Application Project.


Step 17: Enter the name of the project "HelloWorld" then click "Next".

Step 18: After that click "Next" until click "Finish".


Step 19: Click in red as below for expand the panel.


Step 20: Covert the Android project to AspectJ. Select the project name "HelloWorld" and right click then select "Configure" and click "Covert to AspectJ Project".


Step 21: Copy Android Agent "monkeytalk-agent-2.0.10.jar" into the project "libs". Drag and drop the file as below to project libs.
monkeytalk-agent-2.0.10.jar


Step 22: Right click from "libs" of "monkeytalk-agent-2.0.10.jar" then select "AspectJ Tools" and click "Add to Aspectpath".

Step 23: Double click "AndroidManifest.xml" then add 2 line of script as below to the xml file then save the file.
<uses-permission android:name="android.permission.INTERNET" />
<uses-permission android:name="android.permission.GET_TASKS" />

Step 24: Select the project name "HelloWorld" again then right click and select "Properties".

Step 25: Select "Java Build Path" then tick "AspectJ Runtime Library" and "monkeytalk-agent-2.0.10.jar - HelloWorld/libs" then click "OK".

Step 26: Select the project "HelloWorld" then right click and select "Run As" then click "1 Android Application".


Step 27: Congratulations! You have finished Android Agent plug-in then deploy your application to an Android device or emulator for the next.
經過了壟長的說明,已經完成植入 MonkeyTalk Android Agent。
接下來的ㄧ節,我們將會說明 MonkeyTalk IDE 安裝及使用說明,請大家拭目以待 MonkeyTalk 將慢慢進入核心部分...... 測試。
這一節我們說明到這裡,也歡迎各位直接在 Blog 上留言討論,我們下次見。
~ See you ~
參考出處:
http://www.eclipse.org/
http://www.cloudmonkeymobile.com/
http://developer.android.com/
ajdt_2.2.4_for_eclipse_4.4.zip
Help | Install New Software...
Help | Install New Software...
installer_r24.1.2-windows.exe
monkeytalk-agent-2.0.10.jar
<uses-permission android:name="android.permission.INTERNET" />
<uses-permission android:name="android.permission.GET_TASKS" />
經過了壟長的說明,已經完成植入 MonkeyTalk Android Agent。
接下來的ㄧ節,我們將會說明 MonkeyTalk IDE 安裝及使用說明,請大家拭目以待 MonkeyTalk 將慢慢進入核心部分...... 測試。
這一節我們說明到這裡,也歡迎各位直接在 Blog 上留言討論,我們下次見。
~ See you ~
參考出處:
http://www.eclipse.org/
http://www.cloudmonkeymobile.com/
http://developer.android.com/
HI, i need your help regarding the monkeytalk using tool , kindly provide me your email address
回覆刪除Hi, sorry for the late reply. If you don't mind can leave your question here then I will reply you as soon as possible. If you really want to email me please leave your email here also I will try to contact you soon. Thank you.
刪除